I’m not too easily intimidated, but man, I sat and stared at our built-in shelves for almost three months before I put anything on them. I wanted a look that was collected yet cohesive. But where to start?
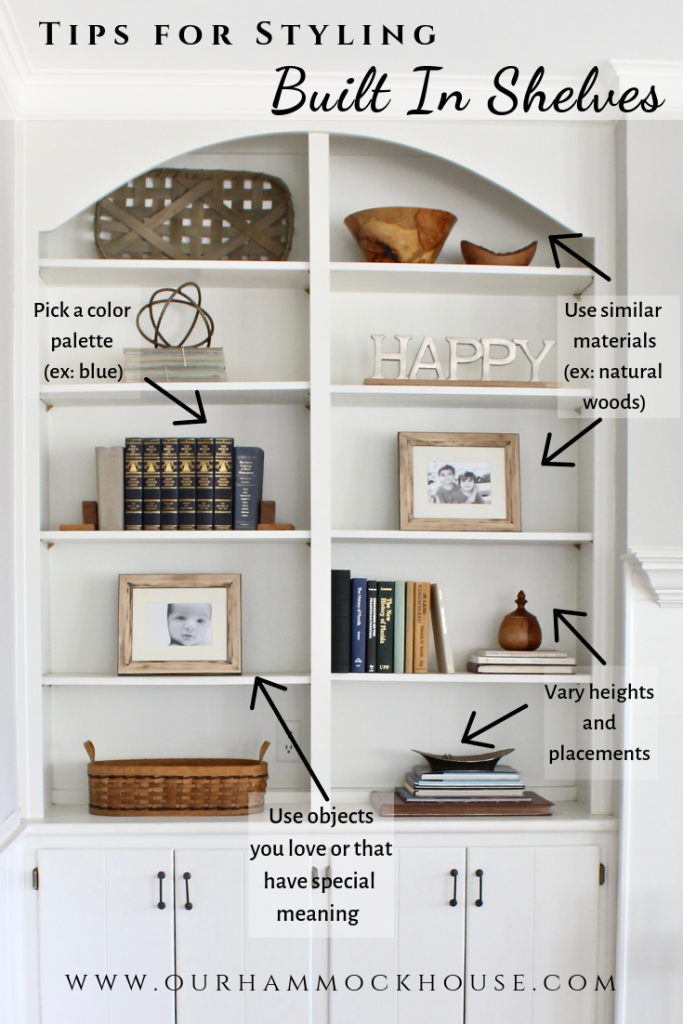
Over the years, we collect so many books, photographs, and trinkets that have meaning to us. Our first reaction can be to stick all those things on a shelf and call it a day. That can look very cluttered, though, which for a Type-A personality like me, can be anxiety-inducing. So, my strategy was to pick out some of my very favorite objects, identify what they had in common, and stick to that palette. In this post, I’ll share with you how (after almost a year) I finally won the battle of the built-ins.

First, I “shopped” our house, found some of my favorite objects, and set them out on a table. I noticed some common themes or groupings in these objects:
(1) Natural wood tones
I’m blessed to have very creative in-laws. My husband’s mother is a talented woodworker. She has turned a number of beautiful wood bowls for us over years. These are very important to us, and I knew they would be a central feature in our built-ins.
I also had some favorite black-and-white family photos, but they were in dark wood frames that felt too heavy for the white shelves. So, instead of buying new frames, I sanded down the old frames to reveal their lighter natural wood tones, and they immediately felt more cohesive.
My husband’s grandmother made sculptures, and we have a fish that she carved out of stone that is very special to us. It was on a black wood base, which, like the old frames, felt too heavy. I sanded that down as well and put on a light stain, and now it coordinates with the other natural wood tones.

(2) Books
My husband’s father was a professor and published a number of books that we wanted to feature in our built-ins. I didn’t love the shiny, colorful dust covers, though. When I removed the dust covers, I noticed that the books’ cloth covers were either blue, white, or cream. Since blue is the main accent color in our living room, I decided to use books that also fit within that color scheme.
I hunted down other books in our existing collection that also had blue, white, or cream binding. I knew we would need even more books, though, so I hit up the semi-annual Friends of the Library sale and scored a slew of coordinating books for 10 cents each. (As a side note: Mark your calendar – the next sale in Alachua County starts on April 21st!)
Now, there has been a recent trend in home design to put books on shelves backwards, so the spine is towards the back and the pages towards the front. I get it – it creates a continuous neutral palette. Even Joanna Gaines does this on occasion. And I love Joanna Gaines’ designs. But – I. Just. Can’t. I spent many years working in a library, and it would cause me physical pain to put books onto shelves backwards. So, I opted to find books with neutral covers instead.
(Another note: When I say I “shopped” my house for objects, I mean it. I couldn’t find simple wood bookends that I liked, so I went into the playroom and dug around in a box of wooden blocks that my mother-in-law made for the boys years ago. I stacked a couple of those blocks together and – voila – new bookends!)

(See that basket above? That’s where we store our phone chargers, phones, and tablets. I widened a hole in the back of the basket so that the power cord could reach the outlet. It’s convenient and much better than having all of our electronics sitting out on the counter.)
(3) Metals
We have a vintage silver bowl that belonged to a great-grandparent that has a lovely patina on it. And, we recently came upon a record player with some pretty brass accents. (This was such a find – I’d wanted a record player for many years and we got this one for free. It also plays tapes and CDs, which is great for someone like me, who still has her entire tape collection. I mean, those mix tapes were a lot of work!) Also, many of the books have gold lettering on their spines. Together, all these little touches of metal are a thread that ties the objects together.
Once I identified my palette for the shelves – natural wood, metals, and blue/cream/white books – I put away my other favorite objects that did not fit the bill. I also picked up a few more filler pieces at HomeGoods that fit within the theme, like a blue and white vase and the silvery gold “happy” sign with a natural wood base.

With all my objects assembled, I began the just-as challenging task of finding the right spot for everything on the shelves. Now, as I’ve previously admitted, styling shelves does not come naturally to me. There are many talented bloggers and designers who have very helpful guidance on exactly how to style your shelves. I pinned a number of my favorite resources to my Built Ins board on Pinterest. Save yourself some time and head over there after you pick out your favorite objects!
Overall, your main goal in styling shelves is to achieve balance. For example, I don’t have all my books on the same level or the same side of the built-ins. I also alternated where I placed the framed photos, so it draws the eye to different points on the wall.
So, pour yourself a glass of wine, turn on some music, and just put something on a shelf. You’ll find that you get into a groove placing objects, taking a step back, and moving things around until it just feels “right.”

Sad to say, but for me, this process lasted almost a year. It took a few months for me to get over my fear and off my butt and just start. And then the act of collecting objects, paring them down, and re-arranging the shelves was ongoing for many months. Frankly, I still find myself tweaking the shelves every so often. But it was worth it, because it makes me happy to look at our built-in shelves and see so many of my favorite things in one spot!
So, to sum it up:
(1) Shop your house for your favorite objects and put them all together on a table
(2) Identify 2 or 3 common elements that some of the objects share (e.g., color, texture, material)
(3) Put away any objects that don’t fit within your palette
(4) If necessary, buy some filler objects that fit within your palette
(5) Fill your shelves with your favorite objects with the goal of achieving balance
(6) Have another glass of wine and enjoy your handiwork! Who’s the boss now, built-ins??

UPDATE!!
Since I first published this post, I’ve been continuing to style my shelves. See what I’ve learned and how my shelves look now: Four Easy Tips for Decorating Built In Shelves.
For more ideas on styling built-in shelves, visit my Pinterest board:
Love this Liv!!! All of it!
Thanks so much!!
They look gorgeous!! You have inspired me to review my nightmare of a built in
Thanks! I’m so glad it was helpful. I’d love to see how your built-ins turn out!
I think I need to redo my shelves now!
I’m pretty sure I’ve seen photos of your shelves and they look great! But, you stare at anything long enough, and you definitely want to change things up 🙂
Lovely, clean, inspiring! Thank you
Thank you Judy! I’m so glad you found it helpful.
They are perfect Livvie!
Thank you 🙂
Simply perfect!
Thank you!!
This is my favorite blog post yet! I didn’t know you sanded down your existing wood photo frames to get the lighter wood tone. That is brilliant. I love the wood toy block bookends too. So creative and resourceful.
Thanks Kim! I was inspired after talking with you over Easter weekend 🙂
Hi Olivia,
This is Uncle George
We’re at your parents.
Regarding Mickey Mouse. Those are not buttons unless they are sewn to his body. I won’t say what they are because you are such a sweetheart but I have it on good authority that it is part of his, well you know.
Love you.
You are too funny!
This is great Olivia! Thank you for doing it. I told you our bookcases needed help but all I did was remove some things. Now I know what to do! As soon as our kitchen remodel is finished! Our dining room table is covered in “stuff” from the kitchen at the moment. 🙂
I am so glad it was helpful! I can’t wait to see how the kitchen turns out. I’m sure you will love it 🙂